Showing posts with label lighting. Show all posts

Tuesday, January 17, 2012

Technique Tuesday: Top 10 Hits of 2011

Top Ten TTues Posts

Good Morning Everybody,

I’m a little light on my report from Imaging USA today.  I was in meetings most of the day and attended the tradeshow late in the day.  I plan to be there all day today so I hope to have more to report tomorrow.

At the beginning of a new year many sites will report top 10 lists on about everything.  Hey, DigitalProTalk is no different ;~)  This is the week for my listings of DPT’s top 10 lists.

For today’s post I spent quite a bit of time reviewing ALL the Technique Tuesday posts from last year, checking the stats, and arranging the posts in order from most viewed tutorials. 

The topics range from off-camera lighting with small speedlights, lighting in lousy locations, my favorite wedding images, Lightroom tips and tricks, and more.  All told, these videos give you about 4 hours of great information. I sure hope you enjoy revisiting each of the links listed today.

TOP 10 Technique Tuesdays For 2011

1 . Trigger Happy Budget Flashes -

2. Impossible Location - Amazing Portraits

3. Supercharge Your Portable Speedlight's

4. You Won't Believe Your Eyes

5. 5 Steps To Better Wedding Portraits

6. Oh, The Lightroom Auto Mask Feature – I Love You, I Hate You!

7.  Light Painting With Lightroom 3

8. 5 Of My Favorite All Time Wedding Images

9. I Just Feel So Vibrant Today!

10. Super Bowls & Weddings

_______________________________________________________

Hey gang, that’s it for me today.  The programing starts early this morning and I need to hit the road to get to the show. I still have nearly half the show to cover and hope to share with you the more interesting happenings from the show tomorrow.

How about I plan to see you same time, same place tomorrow.  Have a great one and I’ll see you then.

Keep your pixels smiling -David

Friday, January 13, 2012

"Man of the Year"

MAn Of The Year"Man of the Year"
©David A. Ziser

Is this a great example of leading lines or what!  Look at how all the structure in the ceiling lead you right to our subject.  Look too how the line of the railing brings your eye directly to the subject.

I still remember making this image years ago, back in my film days.  I was a huge fan of the 40nn Distagon lens on my Hasselblad.  It’s super wide angle field of view did wonders to the composition in many of the locations I worked in.

The main challenge was not the composition, it was the lighting.  The wide angle lens was showing too much of the “space”.  That meant having an assistant holding the light was out of the question – remember, no Photoshop back then.

I solved my problem by placing my radio controlled Metz CT-1 strobe on one of the steps of the stairway you see on the left.  My  low camera angle – I was on the lower stairway framing up the groom – was just low enough to hide the strobe firing on the left.  The wall was still illuminated but I didn’t think that detracted from the image.

And speaking of lighting, notice too the accent light on the back of the groom’s face and neck.  That's obviously is coming in from the strong window light pouring in from behind the groom.

All in all, we have a very dynamic portrait of the groom framed against the wonderful architecture of the building with all lines leading directly to him – I think a very cool image.

Camera specs: Hasselblad 500 CM fitted with 40mm Distagon lens, F 5.6 @ 1/30 second, Kodak Vericolor 800 film.  Enjoy!  -David

Wednesday, January 11, 2012

"Saving Grace”

Saving Grace1 (1)

"Saving Grace"
©David A. Ziser

This is one of my favorite images from a recent outdoor senior portrait session. I love the direct gaze of the young lady right back into the camera. She looks quietly strong and confident as she makes eye contact with the viewer.

The style of the clothing, the colors, the white jacket, the soft, out of focus background all enhance the final composition which speaks to that quiet confidence.

Lighting was with my off camera flash through my Zumbrella  creating the desired direction of light and balancing with the ambient light.

Camera specs; Canon 40D fitted with 70-200mm IS lens at 110mm, F 5.0 at 1/125 second, ISO 800, JPEG. Enjoy! -David

Wednesday, January 4, 2012

Just Breezin' By The Bridge

Breezin By The Bridge_thumb[5]

"Just Breezin' By The Bridge"
©David A. Ziser

I made this image at a seminar a few years ago.  We captured many great images during that shooting session but this one with the wide-angle lens is one of my favorites.

The setting sun and the wide angle view certainly adds to the dramatic feeling of the photograph.  But also look at my composition. Look at the bride's positioning in the frame. The fact that she was placed forward in the composition adds to the visual interest of this image. It almost seems as if the bridge is pushing her into the viewer's eyes.

Lighting was accomplished with my off-camera flash coming in from the right to give me the loop lighting pattern on the subject's face. I cheated the sync so I could manipulate the sky darker than usual to add the dramatic impact.  The puff of wind at the moment of the exposure was an added bonus.

Camera specs Canon 40D. fitted with 10–22mm, F8 @ 1/320 second, ISO 200. Enjoy! – David

Tuesday, January 3, 2012

"Looking to The Future"

Looking to the Future2IMG_0349

"Looking to The Future"
©David A. Ziser

I thought I’d begin this year’s image post with an image taken last year at one of my favorite educational shooting sessions.  This image was taken during my Dave Cross Workshop class in October.  Our bride was beautiful and our locations were amazing!  This was one of the first images from that session.

OK, why do I like this image so much? For me it’s all about the lines.  Look how the lines created by the branches of the trees seem to surround the bride.  Part of that effect was created by how I positioned her within the composition too. The branches on the left all lead the viewer’s eye directly to the bride. And, the trees on the right constrain the image forcing the viewer’s eye to stay within the image. The interplay of these many lines offset by the simple S-curve line we see in the bride’s pose makes for a striking wedding image.

Lighting was simple – my strobe at 1/2 power coming in, from just out of the frame, camera left  shooting through my light softening Zumbrella . The proper balance of the ambient with the strobe illumination made the bride to “pop” out of the scene. I think this style of an image is still one any bride would love to have in their wedding collection. What do you think?

Camera specs: Canon 7D fitted with 18-200mm IS lens at 135mm, F5.6 @ 1/125 second, ISO 200.  Enjoy!  -David

_________________________________________

p.s. Here is a little compositional test for you today. As I mentioned above, I flipped the image in Lightroom.  Hit the “Read More…” link below to see the original.  Which way looks best to you?

Looking to the FutureIMG_0349

Amazing how a simple change of perspective can effect how one feels about the image, isn't it?

-David

Wednesday, December 28, 2011

"Summer Serenade”

Summer Serenade-1078-DZ_McCaanW09-Edit-2

"Summer Serenade”
©David A. Ziser

This image is from a year or two ago and has been featured a times  in my Technique Tuesdays and other lighting/composition discussions. I made it while photographing one of my favorite brides. She wanted some really nice outdoor images and the park across the street from the wedding venue filled the bill nicely.

The larger aperture isolated her nicely from the background. The lines of the canopy structure lead the viewers eyes right to her face. Lighting is from the left - Quantum T5d shooting through my Zumbrella which gives the very soft quality of lighting on the bride's face. The summer colors give a really nice feel to the image as well.

Camera specs: Canon 5D Mark II fitted with 70-300mm IS DO lens at 265mm, F5.6 @ 1/125 second, ISO 200. Enjoy! -David

Tuesday, December 27, 2011

"Beauty Lines”

Beauty Lines-

"Beauty Lines”
©David A. Ziser

This image was made during one of my recent Kelby Training shooting sessions.  BTW, the video should be coming out any time – I’ll keep you posted.

The lesson was on image composition and we have no better example of composition and leading lines than we do in this image.  Look how the line of the railing easily leads your eyes directly to our beautiful model. You’ll also find the lines in the ceilings also pointing your eye to our subject.

Notice too that the vanishing point of this image is opposite our model.  This is a great way to focus attention on the subject.  The entire “space” seems to be coming out and surrounding her.

I was also careful to remove the one or two ceiling lights from around her head to minimize any distracting elements in that part of the photograph.

Lighting was simple – the main light was supplied by the large window out of the frame, camera left.  I used a small accent light camera right, out of frame, and slightly behind the subject to create the separation I wanted of the subject from the background.  It really did a good job defining her from the much darker background.

Camera specs: Canon 7D fitted with Sigma 8-16mm lens at 13mm, F5.6 @ 1/60 second, ISO 800.  Enjoy!  -David

Technique Tuesday: Light Is Light, Right? Wrong? & Wedding Photographers Unite!

Good Afternoon Everybody,

I hope everyone had a WONDERFUL holiday weekend.  Ours was quiet and energizing.  I don't know about you guys and girls, but my Batteries were in deep discharge mode before the holidays.  Over the weekend I hardly got near a computer other than the holiday wishes I posted and what I'm mentioning below.

Over the weekend I did discover a very good way to recharge my batteries.  On Christmas morning, before tearing into each others presents, LaDawn suggested we look back over the year and revisit all the high points.  We found it a bit challenging to do it with instant recall - I guess my brain pixels are slowing a bit ;~) So, I headed over to the computer and fired up Google calendar to refresh our memories and review the year.

Happy New Year 2011 LR_thumb[3]And what a year it has been!  We were traveling for nearly 20 weeks, like close to 5 months, traveling throughout the USA, Canada, and Mexico.  No wonder it felt busy this year, and me the guy trying to slow things down a bit - whew!  We had some great times, photographed some BEAUTIFUL weddings including LaDawn’s son Joshua and new daughter-in-law Kristen. But more importantly, we met some great photographers along the way and especially the photographers we got to know even better from our Sedona and Napa three-day Experience to our week-long Master Classes.

We smiled and giggled for more than an hour just enjoying the fond memories of these past 12 months.  I think it's a good idea for everybody.  Too many times we dwell on the difficulties in our lives and often forget about or dismiss the true high points of the year.  Hey, we've got New Year's Day coming up in just a few - maybe you could take a peek back at 2011 this weekend…. just a thought.

Anyway, It's good to be back today.  The schedule around here this week is not too crazy, my daughter is coming in to visit, and we have one more holiday party to prepare for tomorrow evening.  It will be a nice few days.

That said, why don't we get on with today's post.  First, I want to give you an update on the "I Do" free wedding web event kicking off tomorrow and then we'll get on with today's technique Tuesday.  Here we go...

Wedding Photographers Unite!

I Do smallThe first of three FREE "I Do" wedding webcasts kicks off tomorrow at 10:00a.m. Each one features a different group of speakers.

The line-up for tomorrow looks great and includes some of my favorite young gun wedding photographers. 

The line-up for this Wednesday, December 28th:

11 am CST - Creating Remarkable Experiences / Becker

12 pm CST - No Cost Marketing / Zach & Jody Gray

1 pm CST - Creating a Successful Wedding Business / Laura Novak

2 pm CST - Picture the Perfect Wedding Album / Joy & Jules Bianchi (Brown)

Remember, you can pick up a DVD of ALL 16 speakers, me included, for only $79, and get $250 worth of super cool goodies to boot.  Whcc, ProSelect, Animoto, Shootsac, PWD Labs, & Successware have put together some exclusive goodies [link]. ONLY for those who buy the "I Do" recordings.

Buy before 11 am CST tomorrow, Wednesday, Dec. 28 to get $250 in goodies, and start making the changes for a blissful wedding business in 2012.

Once again, here is the link for all the info. Or just

REGISTER RIGHT HERE!

Technique Tuesday: Light Is Light, Right?  Wrong?

Today I want to walk you through a short discussion about the characteristics of light.  It's not about one piece of lighting gear filling the bill for all you shooting needs. Hey, you don't just use one lens on a job, do you?  Of course not.  It's the same for your lighting gear too.  You'll have to make choices about what lighting gear to use and when is the most appropriate times to use that lighting gear. 

Let's first talk about the size of the lights themselves. Yes, Virginia, size matters when talking about light.  You’ll get a different feeling from the portrait depending on the size of the light source used to illuminate the image.

Why not hit the PLAY button below and see how the size of your light source affects not just how the subject is illuminated but also how the size of the light impacts your portraits.

______________________________________________________

Hey gang, that's it for me today.  I'm the Master Chef for a party of about 20 guests tomorrow and my Henkel's, Cuisinart, and Kitchen Aid are waiting ;~) Have a great rest of the day and I'll see you tomorrow for another great post, "The Most Important Tool In Your Gear Bag". 

See ya' then,  David

Tuesday, December 20, 2011

"Island Beauty”

IslandBeauty5

"Island Beauty”
©David A. Ziser

This is an image I captured on the beach while in Cabo, Mexico.  Our beautiful model, Greta, a friend of our friends Kent and Sarah Smith, and who we were just with last week, did a great job as our beach beauty subject. 

I choose to use my off-camera flash coming in from camera-right in order to create more contrast on my subject which I thought accentuated the contrasting tones of the surf behind her. That lighting direction also gave me the beautiful and flattering loop lighting pattern on my subject’s face.

Notice too how I have the slight S-Curve of the surf working through the image too. I tweaked "Vibrancy" ever so slightly in Lightroom  which kicked the blue water tones up just a notch, added a slight "squarish" vignette, and enhanced the image in Photoshop ever so slightly. 

I love the finished portrait - it's simple, elegant, natural, fun, and a lovely image of my beautiful subject.

Camera specs; Canon 7D fitted with Canon 200mm F2.0 lens (what a lens), F8.0 @1/320 second (cheating the sync), ISO 200.

Enjoy!  -David

Technique Tuesday: Fun At The Beach

Good Morning Everybody,

It’s another busy day around here today. I’ve got to put together two still multi image videos for a client for delivery tomorrow. It’s our last big project around here we need to complete before the holidays.

My favorite software choice for the job is Apple’s iMovie. I’ve tried many others but, even as a mostly PC guy, I still think iMovie offers the best finished result and it makes about the most compelling video presentation you can get. Anyway, on with today’s post.

My NEW Kelby Training Video Just Went “LIVE”

Hey gang, GREAT NEWS! And I’m stoked. I just received an email late yesterday that the first of my two brand new videos for Kelby Training has just gone “LIVE”.  The title, “Photographing Couples”, walks you through my process for photographing engagement couples.  I discuss clothing selection, lighting, composition, posing, and so much more.

Ziser Kelby CouplesWorking with our two models made the shoot a breeze.  Also the fact that they were married to each other didn’t hurt either as we photographed them very romantically together too. I think you’ll really enjoy the video.  You can check it out right here.

Technique Tuesday: Fun At The Beach

Beach DancerI had lots of images and lots of techniques I pulled together for my beach shoot a while back in Cabo San Lucas a while back.

Today’s episode was interesting in how that shoot came together.  We had just started getting some ideas for shooting.  The sun was on it’s way down but there was not a cloud in the sky anywhere.

As I surveyed the surrounds, the rocks above looked promising for my shooting location. The sun was quite bright behind the rocks and gave me a “hotspot” in which I would place my subject.  That was the start of things.

The cool thing about this tutorial is that you literary get to see how the shot comes together – step by step.  First I find the location, then I have to wrestle with the light, then I need to get a flattering pose from my subject – all one step at a time.

The next part of the image making process involved utilizing the digital tools at my disposal – Lightroom and Photoshop.  Just when I thought I was finished with the image I got another idea on how I might enhance it even more.  Again, step by step, I walk you through the process until I obtain the finished image, a result that I’m proud and pleased to share.

To see all the steps come together, hit the PLAY button below and enjoy the show in this week’s episode entitled, “Fun At The Beach.”

________________________________________________________

Hey gang, that’s it for me today.  Lot’s on my plate today and Christmas right around the corner – I’ve got to run.  I’ll see everybody tomorrow for another great post here at DigitalProTalk.com.

See ya’ then, David

Monday, December 12, 2011

"Cabo Friends"

Friends - IMG_0178

"Cabo Friends"
©David A. Ziser

This image was made during our Help-Portrait session on Saturday  in San Jose Del Cabo, Mexico. At the end of the session, we arranged this large group photograph of all the children with all of us. From the looks of all the expressions you see in this photograph its hard to tell who was having the best time - the photographers or those who were being photographed. Needless to say, it was a great experience and I'm sure we’ll be offering to do it again next year.

You can see Kent on the left, his wife Sarah is next to LaDawn. Cindy and Ralph in front row. And Donna and Elsa, the church missionaries, in back row.

Lighting was pretty simple – Paul Buff Einstein flash at half power shooting through my 42 inches Zumbrella camera right. The strobe output was balanced to be about one stop brighter than the ambient light. That was just enough to create the detail, depth, definition, and added dimension to the scene that we wanted.

The final image was tweaked in Lightroom3 to bring up the shadow density just slightly. I also added a gradient at the bottom of the image to tone down the bright desert reflections in that part of the image. I added the final “Color Priority” vignette to give us the final result.

Camera specs: Canon 5D Mark II fitted with 70–200 MM IS lens at 200 MM, F7.1 at 1/250 of second, ISO 400. Enjoy! – David

Wednesday, November 30, 2011

"Standing On The Corner Watching All The Boys Go By”

0001 - Standing On The Corner-

© David A. Ziser

Here is another image captured from that great Dave Cross Workshop I gave back in October. Our model was just beautiful and the park we worked in was to “die for” photographically speaking of course.

This image was made in the middle of the road.  Yes, we were dodging the cars, but the background from this vantage point was just amazing!  Look how the tree branches camera right lead your eye directly to the subject. That, BTW, is why I brought the light in from that direction too.

This is an easy natural pose that really flatters our bride – notice the smooth S-curve line running through her body from head to toe.

Lighting was easy – just my strobe through my Zumbrella coming in from camera right at 1/4 power.

Camera specs: Canon 7D fitted with 18-200mm IS lens at 120mm, F5.6 @ 1/125 second, ISO 200.  Enjoy! –David

Tuesday, November 29, 2011

The Technique Tuesday That Almost Wasn’t Today: I’ve Seen The Light

poGood Afternoon Everybody,

Hey gang, sorry but I have to cut the post short today. We have been totally swamped around here today trying to get everything finished up before we leave tomorrow. Well, I didn’t quite make it.

I was hoping to pull off a cool Photoshop Technique Tuesday but just ran out of time. I do have one very piece of good news for you though. We have the PhotoPro Expo 2012 website “LIVE”. It’s about 99% complete so please check it out. You won’t believe what you see! 

Be sure to check out our complete speaker line up, all the parties, special highlights happening during the tradeshow, print competition, a Day With Jerry Ghionis, and all the other exciting things we have planned.

It’s going to be one very cool photography convention.

PPE screen grab

Oh, what the heck, let me have you enjoy a “blast from the past”.  It’s one of my favorites. here we go…

I've Seen The Light: Or How To Find The Best Light When Shooting Outdoors

In this tutorial I want to walk you through a short lesson in how to find the direction of light in a natural light situation -- say, outdoors. I think this is one of the hardest things for photographer to learn.

You would think it would be a easy but, I can remember years ago when my instructors were trying to teach me how to do it and, I didn't find it that easy. I'm just covering the tip of the iceberg today but I hope it gives you some insights on how to improve your natural light photography. Anyway, it's the PLAY button below and enjoy the show.

________________________________________________________

Hey gang, that’s it for me today.  I’m running late and running out of time.  Have a great evening. I’ll try to get a quick post up sometime tomorrow and we dance through a couple of airports on our way to Mexico;~)

Have a good one and I’ll see you then, David

Tuesday, November 22, 2011

Technique Tuesday: Big Results From Small Flashes

Good Late Afternoon/Early Evening Everybody,

It's been one of those days! We have everyone scrambling like crazy  to get the five volumes packed up and shipped out to our bookbinder so our clients can have and enjoy their albums by Christmas.

UPS DriverLaDawn and Jennifer were putting the finishing touches on the albums and being sure every image looks perfect.  They even talked the UPS driver into making a late pickup so everything would be ready to go. Happily - it looks like everything is going to ship out today. Hip hip hooray!

Don’t You Love Computers?

That brings us to today's Technique Tuesday. Today's post is quite an ambitious undertaking – lots of information, lots of props,  lots of additional video editing – but I think you're really going to enjoy it.

As usual, every time I expect things to really run smoothly the Camtasia software gives me a major hiccup. I had the entire video ready to go but then I couldn’t get it to render. It seems that my screen grab video – 1920x1200 - was much larger than my live video capture and Camtasia couldn't mesh the two together.

Camtasia grab

That meant downsizing the 1920 x 1200 video down to a more manageable size of 1280 x 720. Anyway once I got it figured out it was easy sailing. The third try was a charm and the video rendered beautifully.

As you may have noticed, I have been making the extra effort to get the videos posted as HD. I think it just makes him more enjoyable to view and the added detail enhances the learning experience. My fast new computer is the main reason I'm able to pull it off. No more two or three-hour renders.  Now I can render the video in a matter of minutes.  I have to say, fast is good. Anyway let’s get right to today's post.

Technique Tuesday: Big Results From Small Flashes

Nobody said you had to "break the bank" when making beautiful photographs. In this video I'll walk you through key points that will help you take dynamite portraits with a minimum amount of equipment. This isn't to say that I'm condoning the use of inexpensive equipment – I'm not. As a pro I need to use topline equipment to get the job done efficiently, reliably, and minimalizing any problems due to unreliability. But, that said,  if you’re new to this whole off-camera flash technique, I can at least point you towards some gear that will help you get up and running in no time.Lighting Dojo

Check out my buddy, Kerry Garrison’s website, Cameradojo.com – it's a great website all by itself – but in his online store he offers the two items I referenced in my video today. Check out the video below and if you like what you see than I suggest you check out Camera dojo.com.

My Favorite Flash Gear Is Still Quantum Gear

My top choice for lighting gear is Quantum’s T5d flash head powered by the Turbo 3 super power pack. I still believe the most reliable radio slaves are Quantum Freewires. They're still the gold standard for me and I wouldn't trade them for anything.

Anyway, check out the video, see what I'm up to, and enjoy the show.

We have to remember that light is light and light doesn't care if it came from an expensive flash or an inexpensive flash. Light is still light. Why not hit the PLAY button above and watch my in depth presentation on how to get big results with your small flashes.

Enjoy!

____________________________________________________

Hey gang, that's it for me today. It's been another long day DigitalProTalk and at David Ziser Photography. Hope you guys and girls are gearing up for the holidays. LaDawn has four trees up with 4 or 5 to go ;~)  We’ve got a short day tomorrow so, because of today’s late post, I'll plan to get tomorrow’s post up midday. If you don’t get chance to read it tomorrow maybe you can enjoy after your Thanksgiving dinner on Thursday ;~)

Anyway, have a great rest of the evening and I'll see everybody tomorrow.

Adios, David

Friday, November 18, 2011

DigitalProTalk.com: 3,000th Post Today!

Good Morning Everybody,

3000And welcome to my 3000th post at DigitalProTalk.com. Yes, it's true, today DigitalProTalk.com is 3000 posts old. That's quite a milestone and I have all of you, my loyal DigitalProTalk.com readers, to thank for giving me the incentive to post 5 days a week for these last 4 1/2 years.

Since starting this blog around September of 2007 DigitalProTalk.com now averages about 350,000 page views a month with its 3.3 million readers coming from 205 countries worldwide!  The countries leading in readership are the United States, Canada, Great Britain, Australia, Germany, Netherlands, Sweden, Poland, Spain, and Italy in that order.

Map

Again, when I look at the analytics it just boggles my mind. I'm both humbled and grateful with the readers who have shared time with me at DigitalProTalk.com.

Let me give you more a few more statistics that DigitalProTalk.com has logged. The average daily postings totaling over 1500 words each day brings the total words that I blogged to just a little over 1.6 million. That many words would fill 2 copies of the Bible, both Old and New Testament or 3 copies of Leo Tolstoy's epic novel, War and Peace

There have been over 200 video tutorials posted on everything from lighting, photography, light room, Photoshop, and business building tips.

Find TTues

To give you a little hint on how to find all of them just enter Technique Tuesday in the search box in the top left corner of this blog.

Sales GrothAmong these 3000 posts are over 200 Business Day Thursday posts. These posts are always targeted to photographers, from aspiring professional to seasoned pro, and focus on success tips that can help you continue to grow your business.

There have also been over 1000 “image of the day” posts. It is sometimes challenging to find an image five days a week. With each image I attempt to post the back story, what I was thinking as I was making that image, the technical details involved, and any pertinent lighting details as well. Nearly all the images have been posted with the pertinent excerpt data as well. Daily Image

The easy way to explore the over 1000 images is to just search © David A. Ziser and just about all of them should pop since I include this copyright information with each photograph.

Other ways to search content on my blog is by exploring the topics listing in the right-hand column. You may have to scroll down just a bit to see them.

One thing I like about my blog is that there is no easy way to find any specific point of information. It is very much akin to my CD and DVD collection. Those collections to are neither organized or alphabetical which makes it a nice surprise when I find a CD or DVD selection that really intrigues me. I guess a different way of saying this is that, even for the occasional reader,  DigitalProTalk.com is full of surprises.

Another way to enjoy DigitalProTalk.com is to just browse through the post titles also included in the right column of the blog. Just pick any year, and then any month and then read through the titles. I'm sure you'll find something there that you like.

I've been thinking about changing DigitalProTalk.com header to read more simply:

DigitalProTalk – Stop on by, you'll always learn something here.

Thank You - BigI think that says it all.  So in closing, let me say once again THANK YOU!! to all of my DigitalProTalk.com readers. Thank you to LaDawn for allowing me to continue to take the time to post/research daily. I've said it before and I'll say it again. I'll keep writing if you'll keep reading;~)

I'll see you again bright and early on Monday morning, all the pixels willing. Have a great weekend everybody.

– David

Monday, November 14, 2011

"Lines Of Beauty"

Lines Of Beauty

"Lines Of Beauty"
© David A. Ziser

This is one of my favorite wedding images.  I like the very contemporary feel of the composition, light, and shadows of this presentation.  I’m a photographer who basically likes to “design” his compositions. 

I saw the two long shadows against the rough, stone wall and thought they would offer some great leading lines to our subject.  I positioned her against the shadows and into the bottom fourth quadrant of the scene for maximum effect. 

Now her face was in dark shadows because of how the sun was coming in behind the bride.  I could have chosen my off-camera to add the light, but my Sunspotz reflector did even a better job.  Granted , the light bouncing back from the reflector was “super” bright.  That’s why the bride is looking down.  No problem, I still think the image works.

Camera specs: Canon 40D fitted with Canon 10-22mm lens at 22mm, F18 @ 1/200 second, ISO 200.  Enjoy!  -David

Quick Hit Monday: Model Shoot-Out Coming!; Cool Photography; & Photoshop Goodies, Tutorials, and Freebies

Good Morning Everybody,

Ever have one of those days where you just can't see the light at the end of the tunnel.  I hate to say it, but my entire weekend felt that way ;~) The BIG project for me is to push out the marketing for our upcoming PhotoPro Expo 2012 by the end of this week. 

Let me share with you one of our convention highlights.  It is like way cool.  If you've attended Photoshop World over the last few years, you've experienced the model shoot-out.  It is really fun.  Four bays completely propped and jammed packed with Westcott lighting and great looking exotic models.  Check out the video below to see what I mean - like I said, WAY COOL!. 

Anyway, my good friends at Westcott have agreed to do the same thing for our PhotoPro Expo 2012 convention!  I can't wait.  And, hey gang, that's just for starters.  I'll keep you posted as all the plans to come together. Remember, use promo code PPEDAZ12 to save $100 off registration.

On To Quick Hit Monday:

For today's Quick Hit Monday post I've gathered some very interesting and informative links for you.  I hope you enjoy them.. Let's get right to it.  Here we go...

On Photography:

I didn't find much on wedding photography this past week but did discover some great links with some terrific photography.

McGillicuddy1. Photography Tips From Damian McGillicuddy: A very detailed de-construction of a great fashion shoot. [link]

2. Robert Seale Featured in Digital SLR Magazine:  Some very cool sports photography. [link]

3. 40 Realistic Examples of Levitation Photography: Hey, just for fun - makes me wonder how they were done ;~) [link]

4. The Ten Most Expensive Photographs: After last week's post on the most expensive photograph ever sold, I thought you may be interested in the rest of the Top 10 list of expensive images. [link]

Gadgets – Gear On The Cheap:

RemoteSuper Cheap DSLR Remotes:  Photographers are three things and the first of those is CHEAP - me included.  That's why I liked this link to cheap DSLR remotes.  Uhmmm, remote cameras in front of church during weddings? [link]

Photoshop Lessons, Goodies & Freebies:

This is my favorite section to collect and pull together each week.  I can't believe all the good information available on line.  Check out these links - a treasure trove of Photoshop resources!

Cool Tutorials:

Lighting Effects1 . 5 Incredible Methods to Enhance Your Designs with Light: A wonderful set of lighting tutorials to get great lighting on your Photoshop project. [link]

2. How to play Photoshop Actions on Multiple Images with Batch Editing: I needed to see this again.  It's one of those things you don't do every day.  So seeing the process once again was a good refresher.[link]

3. 30 Worth Learning Text Effect Tutorials in Photoshop: I'm not a big TEXT guy, but the processes described in these tutorials are fascinating to see. [link]

4. 25+ Water Effect Photoshop Tutorials and Brushes: I wish I had known about these techniques for some of my past projects. [link]

5. 30 Rare Outstanding Collections of Photoshop Tutorials: Some of these tutorials are really "off the wall" but following and understanding them will really broaden your knowledge of Photoshop. [link]

Some Great Freebies:

Florals1. 30 Free Vector Graphics for Your Daily Needs:  A great set of useful Photoshop freebies. [link]

2. Free Tile-able and Seamless Pattern Sets:  More FREE stuff. [link]

3. 450+ Free Unique Photoshop Brushes:  I'm such a BRUSH junkie. [link]

4. Free Graphic Design Software Reviews and An Amazing Showcase:  OK, GIMP has been receiving a lot of play lately.  But now it also has a working version of "Content Aware Fill".  GIMP is FREE - Amazing!!! [link]

Wrapping With A Little Inspiration:

Stunning Photo Manipulations Inspired by Nature: I'm always amazed at what the digital artists can pull off in Photoshop. [link]

________________________________________________________

Hey gang, that's it for me today.  I've got to get back to my real job.  I hope you'll join me tomorrow for another episode of Technique Tuesday.   

Hope to see tomorrow, David

Wednesday, November 9, 2011

Thoughts On Passion & The One That Got Away: Oh No It Didn’t! It’s One Pretty Photograph!

Good Afternoon Everybody,

LaDawn and I saw a great play last evening at our local Playhouse in the Park theater. At the end of the 90 minute play I was the first one out of my seat with a standing ovation. The play was entitled “Red”. Red PlayIt was a story about a Russian immigrant artist named Mark Rothko (1903-1970)[link].

The play opens with its main actor exuding the passion of the artist. We both sat in the grip of that passion for the full 90 minute play. The only other actor played the part of Rothko's assistant. You could see as the play developed that  passion eventually was rubbing off on his young assistant too.

Your Passion Will Make A Difference In Your Photography

What struck me about the play was that every artist, including photographers need to exhibit passion to take their work to the next level. Rothko went from an unknown artist to one of the most renowned artist of his time, with his work selling in the multimillion dollar range these days.

The other thing that struck me was the fact that Rothko was from the generation of artists who were beginning to fall out of favor with the art lovers of the times. A new breed of artists including the likes of Jackson Pollock and Andy Warhol were making their way onto the stage in the art world. Their work was considered fresh, different, more alive, then the generation before them.

Mark RothkoWhat struck me about this aspect of the play was a similarity to wedding photographers today. Sure, we can look back at the wedding master's of the last several years and figure that they may be “old dogs not willing to learn new tricks”. We may feel that the gauntlet should be passed forward to the new generation of wedding photographers gaining prominence in today's field of wedding photography.

For me, the point made last evening was that all artists, regardless of the generation from which they come, must exhibit a sense of passion about their art to make their work their best. It's not about changing styles, and those styles going out of fashion. It's about the photographer himself or herself making a difference to the profession because of the passion they bring to their profession.

I challenge each and every one of you reading this post today to bring your own passion to your art and your craft. Because it is only by bringing your passion that WILL make a difference in this wonderful profession of ours. The big difference between good photography and not so good photography is more importantly about photography that is executed with passion versus photography executed with little or no passion.

Be a passionate photographer – ALWAYS!

The One That Got Away: Oh No It Didn’t! It’s One Pretty Photograph!

Okay, I know I started today's post out on the serious side but I really do think that these comments are important. That said why don’t we get on with today's post.

In the past, I've reserved this column to the photographs that were really, really good but just missed the mark by a hare’s breath. As I was looking through the student images from my Napa workshop a few weeks ago, there were a few images that I thought hit the mark perfectly. The image below is one of those images.
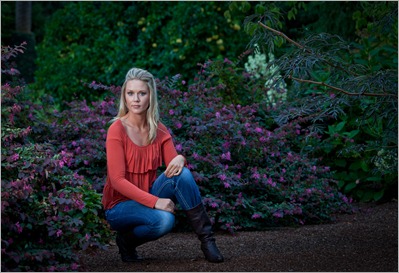
0001 - TOTGA c 4-5618

I had nothing to do with setting up this image in any way. It was one of the images submitted for our image review by one of the class members.  Let me tell you why I think the photographer really nailed it with this photograph.

1. First of all the subject’s placement is perfect within the frame.  If we lay our nodal points on this image, you can see that her face is perfectly positioned within nodal point #2.

2. I love how the photographer positioned the rest of her body too.

0002 - TOTGA c 4-2

Notice how her left leg is kicked out just slightly. For me, the lines of her body, pretty much follow the lines of the foliage and flowers in the background.  Notice too how the purple flowers also seem to kick out to the right much like her left foot is in the foreground.

3. I also like how the purple flowers seen to surround our subject. The position of the subject against that background I thought, created a very nice portrait setting.

4. I also think that the lighting is pretty much nailed in this image. The light seems to be coming from camera left and it is throwing the perfect loop lighting pattern on our subject’s face.

This could be a perfect portrait for, say a high school senior or any other young adult. I didn't get a chance to see the maker’s other images but I'm sure if he/she explored the expressions by ranging our subject’s expressions from serious, as we see here, to a full smile, I think this young lady would be very pleased with the results.

Now let's take a look at the next image.  I'm assuming it was made by the same maker as our first image. What I do like about this image is the fact that it points out what I believe we all should keep in mind when photographing on location, particularly high school seniors.

0001 - TOTGA c 2-5631

Let's talk about the use of props when we’re out photographing our subjects. The point I want to make is this.  I think it's a good idea to bring additional props along for the shoot.

The case in point is seen in this photograph here.  It's the same beautiful young lady in the same beautiful setting but what's the difference between this image in the previous image?  The differences in the prop.  And that prop is the scarf she's holding around her neck.

Notice that the scarf is in the same color palette as a purple flowers behind her.  That being the said, incorporating the scarf into the scene was used to make an even stronger and more beautiful portrait of our beautiful young lady.

I think this image makes that point quite effectively.  As I said, it may not be the best photograph but it still catches my eye enough because of how the scarf’s colors repeat the colors of our lovely background.

So keep this in mind.  When heading outdoors for your next shoot, be sure to take a few additional props along with you.  That may include scarves, hats, anything that can repeat and enhance the other elements of your location.

Since I've been photographing less brides and grooms lately and more of the kinds of portraits that you see in today's posts, it strikes me that the props ARE important to my photographic sessions.  I think these props can really enhance the outcome of our sessions and I am continually thinking how I can add props to my future portraits.

If you've got any ideas along those lines,I would certainly like to hear about them.Why not add your suggestions to the comment section below and share them with the rest of our DigitalProTalk readers.

____________________________________________________

Hey gang, that's it for me today. I'm still playing catch-up around here and still have quite a ways to go.  The top project I'm working on is our Photo Pro Expo 2012 convention. I've mentioned it a few times here at DigitalProTalk.com but now we are less than three months away and I've really got to kick things into high gear.

PhotoProExpo 2012 w-pics,prices

You can save yourself $100 by using PROMO CODE PPEDAZ12 and bring the cost of the four day event down to only $179!  All the info can be found right here.

I've also mentioned that it's going to be one of the top conventions of 2012 – 15 World Class Speakers, 4 Full Days, 1 Fantastic opportunity!  I really hope that you will help me make it a great success by making your travel arrangements into the greater Cincinnati area next February and plan to be part of one of the most exciting photographic events of the year.

On that note gang, I've got to get moving.  Lots of work to do and to little time.  Have a great day and I'll see you again tomorrow for another episode of Business Day Thursday.

Thanks everybody, see you then, David

Wednesday, November 2, 2011

The One The Got Away: How Small Things Can Make A Big Difference

Good Morning Everybody,

We arrived safe and sound yesterday afternoon and were settled in by early evening.  The drive into Sedona, AZ is a wonderful preview to just how beautiful this part of the world is.

Sedona Appraoch

We’re here for a few days on non-photography related business and then a few days of R&R before heading home on Sunday morning.

LaDawn and I are trying to claim today as a day off so let’s get right to today’s post.

Sync Cheating Lighting Part 2, Continued…

Hey everybody, thanks for all the comments on yesterday’s post Light Bending, Pixel Pushing, Sync Cheating Lighting! [link].  Many of you mentioned why I don’t use High Speed Sync features built into the Nikon and Canon flash system. 

HighSpeedFlashSync_thumb5Here’s the deal – High Speed Sync works just fine BUT only up to certain distances.  It’s great for short range flash shots up to about 6-7 feet away according to my informal testing. 

That means it really falls short for the much longer distances I prefer to use my flash.  That’s another reason I prefer the Quantum flash.  It’s about 3 times more powerful than my Canon 580 EXII shoe mount flash.

And finally, if you followed yesterday's tutorial, I used my sync cheating technique to literally change how I illuminated the image.  I manipulated how the light lit my subject to very good effect as I tried to demonstrate in the article's accompanying images.

The One The Got Away: How Small Things Can Make A Big Difference

Today I’m taking liberty with one of our recent class members very beautiful images to help make my point.  Let’s take a look at the image to the right.  It’s a beautiful portrait, isn’t it?

TOTGA2 -1

I love several things about this image:

1.  I love how the maker positioned the subject within the partial arch you see in the background.

2. I love the easy pose and soft expression on the model.

3. I love the soft loop lighting falling on our model.  It’s doing a great job giving dimension to this portrait

The bottom line is that this is a very nice portrait.

OK, now time for just a little, I promise, just a little nit-picking. This image, although very beautiful, could have flattered our subject just a bit more.  When posing my subjects, I always find myself working with the classical views of the face.  That is - I try to photography my subjects the same way the great portrait painters of years past painted their subjects.

Bear with me here – I told you this was going to be a nit-picking discussion. I wish the subject was turned JUST SLIGHTLY back towards camera.  Two things that bother me slightly about this image are:

1. Notice that the far eye isn’t framed by the far part of the face and seems to hang out into space.  With the subject’s head turned a bit back to camera, the eye would have been framed up and we would have a more flattering portrait of our lovely young lady.

2. More importantly, look at how close the tip of the subject’s nose is to her cheek.  The nose is so close that what we see is what I like to call the “Pinocchio effect”. The net effect for the viewer and to the detriment of our model is that the nose appears larger that it really is.

TOTGA2 -2Now let’s look at another photograph of this same young lady.  See how she has been turned ever so slightly back towards camera.  Notice too what a difference it makes to her portrait.

Here facial features are better represented which makes her look great.  Notice that in the above image those facial features looked a bit cramped.  Notice too that with the far eye contained by the far side of the face and with the nose placed further away for that far cheek, we have a very flattering view of our model.  It was only a tiny change, but it did make a big difference in our finished portrait.

Everyone wants to look good in front of the camera and as portrait photographers, it is our job to do just that. I really try to keep things very simple in my approach to photographing people.  I mostly follow the rules of what the great artists of years past followed when they painted the kings and kings and dukes and duchesses of the day.

I want my clients to look like royalty too in front of my lens. Why? Because they are! And, that perspective alone can change how you create your next portrait.

_____________________________________________________

Hey gang, that’s it for me today.  I promised LaDawn a day off before our two very busy days coming up tomorrow and Friday.  I’m making no promises when I’ll get the posts up either, but hang in there, I’m sure something will pop.

Have a great rest of the day – hope to see you tomorrow.

-David

Tuesday, November 1, 2011

Technique Tuesday: Light Bending, Pixel Pushing, Sync Cheating Lighting! A Life Of Living Dangerously!

Good Morning Everybody,

We arrived safe and sound after a short and uneventful 4 hour drive from Palm Springs to Phoenix yesterday.  During the drive we continued to listen to the Steve Jobs bio.  He’s about 30 now, worth about 250 million from Apple going public and just threw himself a birthday party for 1,000 of his closest friends. Oh, and he’s about to be ousted by John Scully and the Apple board.  Like I said yesterday, a very fascinating story.  Anyway, the listen sure makes the driving time go by quickly.

Sedona RidgeWe have a quick business meeting this morning and then its on to Sedona, AZ.  We hope to be settled in by around 3:00 p.m., catch dinner with a friend tonight, and have a complete day off tomorrow.  We love that part of the country and I hope to spend some time hiking and capturing some great photographs while we’re there.

Anyway, that’s the latest update on our travels, how about we get on with this week’s episode of Technique Tuesday.

Light Bending, Pixel Pushing, Sync Cheating Lighting!

I’m a BIG fan of “cheating the sync” on my DSLR.  Maybe it goes back to the film days when I was shooting Hasselblads.  The medium format Hasselblad had the ability to sync up to 1/500 second and that gave us Hassy shooters the ability to really work the light outdoors especially when using flash.  That 1/500 second let us create some gorgeous sunset images because of the that fast sync speed.

Check out the three images below made years ago on my Hasselblad as I increased the sync speed from 1/30 second all the way up to 1/500 second and in about 45 seconds.  What a difference the faster shutter speed makes in adding a dramatic feel to the image.

1-30 sec

1-125 second

1-500 secWhen I first transitioned to digital in 2000, one of my first cameras, a Nikon D1x synced all the way up to 1/500 second – no big deal – it made the transition from film to digital rather easy.  This next image was made at 1/500 second on my old Nikon D1x – pretty cool, don’t you think?

Early wedding pic

The only thing I had difficulty adjusting to was the rectangular format. Hassys shot square format. Nevertheless, I did enjoy that faster sync speed.

As the cameras “improved” the sync speed was reduced to about 1/250 second for most of the camera manufacturers.  Now it became a “pain in the neck” to achieve the same results I was getting at my faster sync speeds.  What was a photographer to do?  It was time to live dangerously, throw caution to the wind, totally disregard what the camera manuals said about the “native 1/250 second sync speed” and kick things up a notch!

JailShutter Sync PoliceSo what happens when you begin syncing your flash images to 1/320, 1/400, or even 1/500 second?  Are the “shutter sync police” going to arrive on the scene and throw me into the, dark “shutter sync” jail somewhere?

Do Not RemoveI thought not.  I had been down that dangerous path before, many times, as a matter of fact.  Yes, I used to routinely rip the “Do Not Remove Under Penalty Of Law” labels off of pillows and mattresses.  Since I had danced down that perilous path before, I was ready to challenge the “Shutter Sync Police” this time – bring it on!

StartrekSo what really does happen when you break the rules, push the envelope, tread where most photographers have never treaded before?  What happens is that all sorts of new lighting/photographic possibilities open up for you.

Cheating the sync gives you a brand new way to control your light on the scene.  It gives you wonderful control on how you light your subject.  Now it’s easy to create a much more dramatic look to your images with your new found understanding of how to cheat the sync on your camera.

All kidding aside, it’s a great way to stretch the boundaries of photographic possibilities and easily create images that would have required a lot more equipment and a lot more time to produce.

Why not hit the PLAY button below and enjoy the show.  I think you’ll really enjoy this week’s lighting tutorial and get a real “kick” out of the results when you see them. 

It’s not “brain surgery” or “rocket science”.  It’s just a cool way to get a really nice visual result.  Come on, walk on the wild side with me and check it out ;~)______________________________________________________

Hey gang, that’s it for me today.  We are heading out shortly for my meeting and then it’s on to Sedona, AZ.  I’ll plan to see you tomorrow for another episode of the “How Small Things Can Make  A Big Difference”. 

Have a great day, I hope to see you then,  David