Monday, October 24, 2011

"Harry Potter Bridal Portrait"

Harry Potter Bridal

"Harry Potter Bridal Portrait"
© David A. Ziser

I know that is kind of a funky name for this image but that's what comes to mind when I see this image.  During my Dave Cross Workshop last Monday, Kathy, one of the photographers attending knew Philippe Park we were working and suggested shooting around this giant oak tree a short walk from the main road.

The huge branches of the tree were hanging very low to the ground and winding all over the place.  For me I envisioned the lands of Harry Potter and wondered how I could pull off a cool wedding portrait around this giant oak.  Because of the long, low, large tree branches, I decided to go with my super wide Sigma 8-16mm lens.

I had one of our class members holding my strobe well out of the field of view coming from camera left to give me the beautiful lighting you see on our bride’s face. I balanced the strobe light to the ambient and then under exposed the scene by about 1 1/2 stops in order to have my bride really project from the background.

I worked the image in Lightroom to finish placing the tonalities where I wanted them mostly using the gradient tool.  The finished result shows an almost spotlighted lighting effect on our bride allowing the rest of the scene to be ominously dark and foreboding just like so many of the Harry Potter movies.  Anyway, I love how the image came out. 

Camera specs: Canon 7D fitted with Sigma's 8-16mm lens at 16mm, F5.6 @ 1/250 second, ISO 400.  Enjoy!  -David

Setting Up Google+; Inspiration; Lightroom Presets; And Lots Of News You Need To Know

Good Morning Everybody,

We had a great seminar in Brea, California last Friday. My Captured By The Light tour was hosted by our good friends at the Orange County Photography Center.  From left to right - David LaNeve, and his wife Julie, myself, and my buddy Don Zimmer.
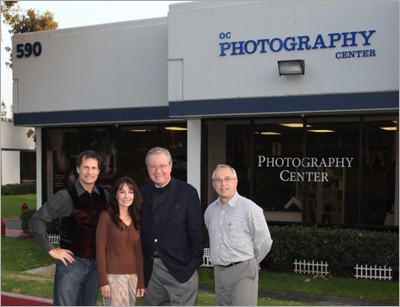
Orange County PC

What they have put together is quite unique proposition for photographers.  Here is the deal.  A photographer pays a very reasonable monthly fee for membership into the Photography Center.  For that fee, that have the privilege of using the extensive facilities, reception area, sales areas, several large and one  huge shooting studios anytime they're available. 

What a great way to cut down on the exorbitant overhead of owning your own studio location.  I think it's a brilliant concept for any photographer wanting to be more professional, more profitable, and more creative in these extremely competitive times.  Check out the Orange County Photography Center right here.
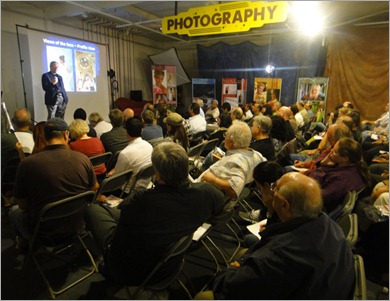
DAZ OCPCThanks again you guys for hosting our sold out, standing room only CBTL seminar last Friday - a thoroughly enjoyable experience!

The Whirlwind Continues This Week!

It's been a whirlwind of teaching, travel, and shooting these last three weeks.  From a webcast with Suzette Allen 3 weeks ago [link], to my Master Class 2 weeks ago (recap here), then to Tampa for a wedding and my workshop for Dave Cross, programs in San Diego and LA last week, and our sold out Napa Experience this week, it will be nice to slow it down a bit come Thursday morning.
Lush, Ripe Wine Grapes with Mist Drops on the VineIt has been a kick!  With all the teaching, about the most I've done in this long of a stretch, it has been quite an invigorating experience in helping me get my "brain juices" flowing.  I even mentioned to LaDawn on our 7 hour drive to Napa/Sonoma area on Saturday how excited I was with all the images I've had a chance to create these last three weeks.  I cant wait to see what happens during my Napa Experience class this week.  As usual, you will be the first to know.

From The Students Perspective - Thanks For The Very Kind Words

Before we get into today's post, I'd like to share with you two very nice posts from three photographers we’ve met over these last few weeks.

First from John and his wife Susan who attended our Master Class.

DAZ MC CandidJohn writes, “I wanted to take a moment to thank you for the excellent Fall Master Class that we had the opportunity to take last week. Susan and I learned a bunch and had a lot of fun doing it. Thanks also to LaDawn (for her efforts in the class as well as on the home front), Jennifer and all your staff and coaches that made it possible.”

John did a very extensive day by day write up on my Master Class right here. Thanks again John and Susan for the very kind words and the great coverage of the week!

Secondly from Kevin Braun from my Dave Cross Workshop

DAZ at DCWKevin Graham, who was signed up for my Dave Cross Workshop, had been contacting me for weeks about helping on my Tampa wedding.  I figured I could use the additional help and I agreed to have assist. It was baptism by fire - I gave Kevin a quick lesson on my Quantum strobe and how to use it about 30 minutes before the shoot.  We were off and running for the next 9 hours without much of a break.

Kevin did a great job - hey Kevin, you can help me anytime - he nailed the light placement and anticipated what I was going to do next and what I might need to make it happen.  The shoot went off perfectly and we got some great images of the couple.

On Monday we all gathered for my Monday workshop.  Kevin was one of the participants and did a great write up of his experience assisting me on my wedding and  my class right here.  He also some some terrific images from the Monday session.  You can find his post right here.  Thanks Kevin for all the kind words.

OK gang, we haven't had any quick hits posted for the last few weeks so I've got a nice supply for you today.  Why don't we get right to it.  Here we go.

A Few Quick Hits: Lightroom 3, Goggle+, and A Little Inspiration

1. Google+ Set Up Guide: 

With 40 million people signed up, the folks at Google must be doing something right.  Want to get off and running on the right foot with Google+, then check out the link right here to a very handy Google+ setup guide.

2. Lightroom Presets Just In Time For The Fall & More

Being in the middle of  Autumn and the beautiful fall colors, even in the Napa/Sonoma areas, I thought it would be appropriate to post a link to fellow blogger, Matt Kloskowski’s Lightroom presets for Fall foliage.  You can find them right here.  Thanks Matt.

And while we’re on the subject of Lightroom 3, why not steer yourself over to PresetHeanen.com and pick up their 5 most downloaded Lightroom presets right here. It keeps getting better all the time.

3. Looking Good At The Wedding

ThRedHeadsOK gang, got a classy black tie wedding to shoot?  Then go out there and shoot that wedding looking really good.  One of my favorite clients has been featured in this blog many times has just started a brand new business – ThRedHeads.com.  I love the concept – tux shirts that rock.

What I love is their ability now to do made-to-order tuxedo or dress shirts for wedding parties in a gorgeous array of 16 colors, as the couple may choose what best enhances their color scheme for a truly remarkable wedding! They also have four designs IN-STOCK for weddings that may happen sooner, including a fantastic Tartan which would look amazing for holiday & winter weddings.

Hey, I have my shirt and love it!  What a great idea to share with your wedding clients too.  You know, it’s always the difference that makes the difference – even in tux shirts. Check out their rockin’ tux shirts right here – nothing like them anywhere, you’re going to love them! –David

4. A Little Inspiration To Start The Week

My long time friend, Terry Deglau, has been posting to his blog, “A Creative Mind Is A Moving Target” for several months now.  Each post is more exciting than the next.  Terry has been part of this profession for many years first as a photographer, then a  very long stint at Kodak Company, and now retired Terry is sharing his rich lifelong experiences for photographers to read everywhere.

Terry BlogWhat we have available in Terry’s weekly blog is a peek into the mind of wonderful artist, photographer, and industry friend.  Each week’s post is a must read and I never miss them.  Check out his latest post exploring 100+ iconic portraits of all time.

In Terry’s words, “This is going to blow your socks off.  Kick back, grab a blanket on this chilly Sunday, a hot pot of coffee, and settle into your favorite chair, and just take in, consume, and enjoy these images of characters who formed our world around us.  I should publish these as a small coffee table book, to enjoy today, tomorrow, on and on.  I have read this post at least 10 times and after lunch, I will again.”  Here is the link right here.

5. The View From The Top Of The World

Mt EverestAre you ready for your mountaintop experience?  I have always been enthralled by stories featuring climbs to the top of Mount Everest.  I had a client who climbed many of the mountains in that part of the world including K2, another of the world’s tallest mountains.

Maybe I am living vicariously through the eyes of others who have made it to the top of the worlds tallest peaks.  Nevertheless that view must be a breathtaking sight.  How about following this link right here to see the first ever 360 degree panorama image ever taken from the top of the world.  Prepared to be inspired!

_____________________________________________________

Hey gang, that's it for me today.  My Napa Experience workshop begins in just about an hour so I've got to be hitting the road.  I'm really looking forward to these next few days. Fran Russell, one of my former Master Class alums has set up our winery locations and all the models.  I hear both the models and the locations are amazing!  The really cool thing is that 2 of our Sedona alums are also attending the Napa Experience.  I have to say, I'm quite flattered.

We had a nice meet up at Fran’s studio last evening and everybody got a chance to meet and “break the ice” for the week. We have a great group and LaDawn and I are really looking forward to the next few days.

How about I check in with everyone bright and early tomorrow for recap of todays shoot and another mind bending (OK, that’s pushing it a little) fabulous Technique Tuesday.  I promise, it will be a good one.  It's title - Light Bending, Pixel Pushing, Sync Cheating Lighting!

Have a great day everybody.

See ya' tomorrow,  David

Friday, October 21, 2011

"Blowing In The Wind"

Blowing In The Wind

"Blowing In The Wind"
© David A. Ziser

This image was made on Monday during my Dave Cross Workshop. We had dropped down to the water walk which offered some gorgeous natural light for many of the images I shot.  I wanted to do something different though.  I wanted to turn the bride’s face away from the  natural direction of light and light her with flash from the other direction.

I placed a small radio triggered shoe mount flash on the ledge camera left.  This image gets kind of interesting when you hear how I pulled off the interesting “Hollywood” spot lighting on the bride. 

I chose to use, are you ready, a 1/500 second shutter speed!  Using this faster shutter speed only exposed the top section of the camera's CMOS sensor during the exposure where the bride’s head was placed leaving the rest of the scene unaffected by the flash. 

The finished result shows an almost spotlighted lighting effect on our bride allowing the rest of the scene to go about 2 stops darker.  Kind of cool, don’t you think?

Anyway, I love how the image came out.  And, guess what, I discovered a brand new way to make my lighting exciting.

Camera specs: Canon 7D fitted with 70-200mm IS lens at 200mm, F 8.0 @ 1/500 second, ISO 200.  Enjoy!  -David

A New Book In The Works & I Need Your Help!

Good Afternoon Everybody,

I've got some great news for everybody today.  I just had a meeting with my good buddies at Kelby Media who published my first book, “Captured By The Light”, and guess what - I just got the OK for my second book, "Make Your Lighting Exciting".  And I’m stoked!

Here is where I need your help.  I've got a rough outline laid out for the book but I would sure like to get input from our loyal DigitalProTalk.com readers in case I missed anything.

Let me show you what I've got so far.  Here is the super rough draft of ideas and it targets all photographers, not just wedding photographers..

Make Your Lighting Exciting:

0046-Kelby - Hope and Ben-IMG_8121- The characteristics of light

  • Small Light source
  • Large Light source
  • Hybrid light sources

- Do brands make a difference - Light is Light

- What kind of lighting and when to use it:

  • For brides
  • Larger groups
  • Character studies
  • Lighter skin vs. darker skin tones

- Why understand lighting ratios:

  • Contrast control
  • Specular vs. diffused highlights

Pretty In PinkIMG_9528-Edit- Make your lighting exciting:

  • Lighting for mood
  • Lighting for beauty
  • Lighting for dramatic effect

- The right lighting for your lens choice

  • Wide angle lens, what kind of light
  • Telephoto lens, what kind of light

Hot To TrotIMG_1830- Light sources

  • Shoe mount strobes
  • Off camera portable strobes
  • Studio lighting
  • Continuous output lights

- Using lighting to create shadows

  • Shadows for backgrounds
  • Shadows for dramatic effect
  • Shadows to hide defects
  • Shadows to create dimension
  • Shadows to flatter the subject

- Lighting gear that doesn't break the bank

- Easy lighting setups to get great results

- Reflectors made easy

0006- Perfect PortraitsIMG_2219- Telephoto reflectors, or how to really throw the light

- Everyday items that make creative light sources

- Creating your own "shoestring budget" lighting studio

OK, What do you think so far?  I'd sure like to hear from our readers with any additional ideas and topics you would like to see covered.

How About A $50 B&H Gift Certificate For Your Thoughts?

I'll tell you what I'll do.  Everyone who submits an idea or topic will be eligible to win a $50 Gift Certificate from B&H - how about that for a little incentive;~)

I can't wait to see what you come up with.  Please leave all your suggestions in the Comment section below with your name.  In a few weeks, I'll review the ideas to date and see what we've got and then select a winner. 

____________________________________________________

Hey gang, that's it for me today.  I've got to get ready for my program tonight at the Orange County Photography Center.  It looks like we've got a full house and I'm really looking forward to visiting with everyone this evening.  I sure hope you can make it and please be sure to come on up and say HI.

We head out tomorrow for Northern California for my Napa/Sonoma Experience beginning Sunday evening.  So over these next few weeks, I should have some pretty exciting images to share with you.

Have a great weekend and I'll see you bright and early on Monday morning from Wine Country.

-David

Thursday, October 20, 2011

"Stormy Days Ahead"

Stormy Days Ahead

"Stormy Days Ahead"
© David A. Ziser

OK, this doesn’t look like a very romantic wedding image.  Add to that the title I’ve selected for this image, it doesn’t even sound like the marriage is going to last.

Call it all poetic license – I just like the very dramatic look to the photograph.  It was our second day shooting in Florida and the sky just wasn’t going to yield a rich blue sky with white puffy clouds.

How did I pull it off?  It was pretty easy.  The first secret is to use a very wide angle lens because it gives you such a wide perspective and really draws the clouds into the scene.  The second secret is determining the exposure for the over all scene and then underexposing the scene a bit to add the drama to the sky.

The exposure on the bride was created with my off camera flash coming in from camera right.  The challenge was this.  Since I was using such a small aperture, I needed to get the strobe close enough to the bride to establish the proper exposure on her face.  In reality, part of my assistant was actually in the photograph along with my strobe and monopod on the right hand side of the image.

Whenever your light source is in the photograph, be sure to place it in a “Photoshop-able” part of the scene.  The light and part of my assistant could be seen in the clouds on the right.  But with a quick application of PS CS5 “content aware fill”, they were easily removed in a matter of seconds leaving me with this dramatic wedding image.

Camera specs: Canon 7D fitted with Sigma 8-16mm lens at 8mm, F14 @ 1/320 second, ISO 200.  Enjoy!  -David

Business Day Thursday: Are You Stealing Your Work – Part 2

Good Morning Everybody,

What a great time we had last night in San Diego.  I can’t believe it –when I added up all the door prizes we give away, it totaled over $3,000!!!  My sincere thanks to all our sponsors, especially our newest sponsors, OnOne Software and Calumet Photographic who combined put up $800 worth of the prize winnings.

We had a wonderful crowd and they were locked to their seats till  we wrapped the program about 10:35 p.m.  LaDawn was also thrilled I ended the program just about on time too ;~)   (Yes,you are correct, that made me VERY happy!) The program went off without a hitch.  Today it’s on to Las Angeles/Orange County where we will present my Captured By The Light program tomorrow evening and we will give away another $3,000 in door prizes! We still have a few seats available – not many, but a few.  I hope you’ll join us.

Are You Stealing Your Work – Part 2

TheifFor today’s Business Day Thursday post I want you to think about something important.  If you attend someone’s workshop, like mine for example, or grab some shots from say a big shooting setup extravaganzas like the American Photo Model Shoot that has been touring the country, do you take credit for the images you capture and claim it as your own?  I think it all depends.

Recently I received a comment from Rob Goldstein, one of our DPT readers.  He posed the question about the legitimacy of posting your shots as your own in this type of situation.  Scott Kelby hosted a long discussion on "the Grid" about posting shots from workshops in your portfolio. 

The thrust of that Grid episode was Make it your own. These four words sum up a very spirited discussion between Scott, RC and the live viewers on whether or not it's ethical to take a picture snapped during a workshop (especially one where the instructor sets up the entire shot) and put it on your professional portfolio as a representative of your body of work to a potential client. – you can find that episode right here.

Here are my thoughts on the subject - which I’ve posted here a few years ago, but are even more relevant in today’s new photographic educational climate.  Years ago at the beginning of my photographic career I attended a week long workshop by the top wedding photographer of the time, Rocky Gunn. 

Rocky GunnHere is a photo of Rocky in the middle with a very young Monte Zucker on the left and Bill Stockwell, also one of the top wedding photography influencers of the day.  Rocky was undoubtedly one of the most inspirational and influential wedding photographers. Let me share my thoughts and experience with you again about that week with THE wedding MASTER.

During that week, we had a beautiful couple who was posing for us or rather posing for Rocky. Each of the class was going to receive Rocky's top 50 images for the week.  That was like a really BIG thing - we got a chance to take a bit of Rocky home with us so we could study his images, refresh our memories and eventually take our own photography to the next level.

I Had The Gear – I Was Going To Get The Shot Too!

Sure, everybody was shooting over Rocky's shoulder to try to capture the shot. Everybody had their cameras blazing taking photographs of the couple. I remember at one point Rocky found a spectacular location, posed the bride and groom into a beautiful composition.  Next, he grabbed a 40mm Distagon lens super wide angle lens and placed it on his Hasselblad.

40mm  DistagonWow! In my camera bag I had the identical lens - a $6000 optic that only a few photographers even owned. I quickly attached it to my camera. I watched how Rocky framed the shot. I framed the image identically and I took the photograph. I thought, “Wow that image will make a great sample print for me when I get home.”

But Was That Shot MY Image?

Here is the rest of the story. After getting back home, I couldn't wait to get my film off to the lab.  It would only be a few weeks till I got the proofs back I was able to see my results.

Anyway, they finally arrived and I started looking through MY (note emphasis on MY) images.  There it was – the shot – the most beautiful shot that Rocky had done all week. Yes, I was holding a nearly perfect replica of Rocky's gorgeous shot in my hands – the image that I had simply pushed the button and taken too!

My intent was to have this negative enlarged to a 30” x 40” photograph, frame it, and hang it in my studio as the example of MY(emphasis again) work.

A Conscience Check & Second Thoughts

Good AngelDon't ask me exactly what happened at this point. Maybe it was my photographic guardian angel sitting on my shoulder whispering in my ear saying, "But David you didn't take that shot.  Rocky set it up and you copied the shot. It wasn't your original creative thought. Why do you think making a large wall sized portrait is representative of your work - it's not.  It's still Rocky's shot!"

Well, the words my little photographic guardian angel whispered in my head hit me in a profound way.  It was at that moment that I realized that I had indeed copied the shot. It wasn't my original idea or even my composition. It was not my shot at all.

I quietly reinserted the negative back into the negative glassine and placed it back into the envelope with all the negatives from the week. I never printed any of those negatives up for samples. They were filed away. And to this day I have no clue where those negatives are.

If I had decided to make up the samples, I would have been stealing - I guess the correct term is plagiarizing Rocky's work.  What credit is that to my own creativity and ability as a wedding photographer - the answer is none. What was important to me that special week was that I learned what Rocky was doing. I was able to take his lessons and let them mix with my own creative juices.  That combination of creativity has allowed me to create many, many images that I could call uniquely my own.

There are many students shooting over the Master’s shoulders.  Many students think they are there for the Master to set up the images so they can shoot the shot to what - call it their own for their "portfolio" images. Folks, nothing could be more unethical.

It's not about copying the work of the Master.  It's about learning the techniques from the Master, blending and mixing them with your own creative processes, and then truly producing an original work on your own.

Experiences From My Master Class

This same thing happens a lot at my workshops. Now we  bring in the cute models and, sure I set up a few of my shots, and sure, some folks shoot over my shoulder, I hope more to reference my shot than to copy it.  But, then again, I don’t know.

Class picHow about class members that take the shooting opportunity to create their own UNIQUE images from the opportunity I have given them through my Master Class or workshop – are they stealing my images?  I think not.  They are taking what I have tried to teach in the class session, adding their own perspective and interpretation to the pose and making an image that they can call their own.  I love this image taken by one of our class members – I wish I had thought of it first ;~)

For example, last week during my Fall Master Class I was blown away by some of the images that were submitted for review.  Many were completely different than anything I shot and in my opinion, that student has the right to use that image in their portfolio.

If on the other hand,  I set up a shot and captured a few images and then a student steps in right behind me and grabs the same photograph, then NO, that is is mine, not theirs.  Simply said – a copied image is NOT an original image!

Getting The Best Learning Experience

My best advice to every "student" reading this is to, with the teachers permission, time sync your camera to his/her camera and shoot wide-angle overall views of whatever they are doing. In my classes, I always give the students a class CD with all the my favorite images I shot from the workshop. Their time synced overviews with my favorite shots gives them a wonderful learning tool whereby then can revisit the week anytime they want and study any of the shots I've put together.

What an efficient way to ramp up learning if indeed you are trying to emulate the work of somebody you truly admire in the profession. When I was attending classes - back in the film days, we never had that kind of luxury. In today's digital world, every student today has the luxury of learning more quickly, the ability to fine-tune our techniques, and become a much better photographers in your own right if you make the effort.

It's not about copying the Master, it's about you becoming a Master yourself!

Food for thought--

________________________________________________

Hey gang, that’s it for me today.  LaDawn and I are heading up to LA later this morning and planning to hook up with my buddy Don Zimmer, DZ West as I’ve nicknamed him.  Don has been involved with the Orange County Photographic Center for many years so I’m looking forward to seeing what he’s been up to.  That is also the location  we will be conducting my CBTL program tomorrow evening.

Have a great rest of the day and I’ll see ya’ tomorrow.

North bound and down, David

Wednesday, October 19, 2011

"A Pretty As She Can Be"

A Pretty As She Can Be

"A Pretty As She Can Be"
© David A. Ziser

I think this is about as beautiful as a bridal portrait can be.  The look of our bride, the subtle smile, the slight tip of the head, the soft S-curve running through her figure, makes this image a classic beauty.  The pose really shows off the dress and the lighting is as flattering as it can be on the subject.  The bottom line, it is one very beautiful bridal portrait.

Now having said that, this image did not come easily together.  We were walking through Philippe Park looking for a location for our next image.  I spotted the large palm frawns that you see behind the bride.  The only problem was that they were too dark.

I felt that if I could brighten the tonalities up considerably, I just might create a pleasing background for my portrait.  I had one member of our class take my Quantum 150 watt-second strobe and get 15 feet behind the bride and point the strobe, at  full power at the palm frawns about 10 more feet away.  That did the job for me placing the tonal values of the palm frawns exactly where I wanted them.

Next I needed to get the beautiful loop lighting on her face.  I pulled out an inexpensive show mount flash, attached my Quantum Freewire radio trigger to it and fired it off through my 42” Zumbrella coming in from camera right. 

Whenever you use a shoe mount flash through an umbrella, be sure the wide angle diffuser is in place so that you get the maximum cone of light coming out of the flash head in order to completely fill the Zumbrella’s translucent surface.  That’s how I was able to get that beautiful soft quality of light on her face.

Camera specs: Canon 7D fitted with 18-200mm lens at 145mm, F5.6 @ 1/320 second, ISO 640.  Enjoy!  -David