I made this image during the Kelby Training shoot I did earlier this year. The plan was to photograph an entire engagement session the way I do at my studio. Those sessions include going to some of the couple’s favorite places, in this case the ice skating ring in Tampa, Florida.
There were pretty good skaters but I wanted a more dramatic look to the image and that meant bringing in the back lighting. In spite of the skating speed, my assistant, LaDawn was able to stay out of view for this image. Using a very wide lens made her quite small in the background.
I love how the back lighting really cast the long shadows back towards the camera. I’ve got them fairly well centered in the image because I didn’t want to crop off too much of the lines of the shadow. My on-camera flash did fire just enough to add the right amount of color and detail to the front of the couple.
They made a few passes before I captured the shot I wanted but it finally worked out quite well and captured a fun moment for the couple. Oh, by the way, I was on skates too – I’m sure Adam caught that in the video which should be coming out on Kelby Training within the near future. I’ll keep you posted as soon as I hear something.
Camera specs: Canon 7D fitted with Sigma 8-16mm lens at 8mm, F5.6 @ 1/125 second, ISO 800. Enjoy! -David
p.s. Want to see a short segment of the video I did from this shoot – very cool. Hit the link below to take a peek – very fun. -David
What do you think of this video?
I love shooting little video segments like this one that I can cut into my Animoto videos. It just makes them so much more fun for the couple, family and friends to enjoy. -David
You know, a lot of what I teach is based on making people look good in front of the camera. As a pro, I think that is one of our main responsibilities to our client. Anything less strikes me as not professional and not befitting of a professional photography studio.
Over the years, it’s always been the job of the artists to flatter the likeness of his/her subjects. Walk through any good art museum and soak in the beauty of the works from Gainsborough or John Singer Sargent portraits. Their sensitivity to “pose” and “lighting” is what makes those images outstanding.
We can learn from those masters too. I NOT saying I want my images to look like museum paintings. What I AM saying is that the light these artists painted into their scenes and on their subject’s was the techniques they created to make their subjects look good.
You know what, light 200 years ago is the same light of today. And, when used properly, can really enhance the portraits of the people we photograph. The artists knew it way back then and the same rules they used in their paintings can be brought to bear in good photography today.
It’s unfortunate that good lighting has fallen out of style with so many photographers these days. I swear I see some photographers carrying placards proclaiming “FLAT LIGHT LIVES – LONG LIVE FLAT LIGHT!!!” I don’t think anything could be further from the truth when it comes to good portrait photography. I understand flat lighting is simply easier. But, beautiful lighting makes for beautiful portraits. Lousy lighting makes for very average portraits.
Why not check out the classical lighting patterns used by the masters over the years and see what a difference it can make in your photography. There’s a lot of “AVERAGE” available today – let’s take the road less traveled when it comes to creating portrait photography. Let’s take the road of the masters. Why not hit the PLAY button below and see how simple it is to “paint” with light - like the masters, photographically speaking of course ;~)
This is one of my favorite wedding images. I like the very contemporary feel of the composition, light, and shadows of this presentation. I’m a photographer who basically likes to “design” his compositions.
I saw the two long shadows against the rough, stone wall and thought they would offer some great leading lines to our subject. I positioned her against the shadows and into the bottom fourth quadrant of the scene for maximum effect.
Now her face was in dark shadows because of how the sun was coming in behind the bride. I could have chosen my off-camera to add the light, but my Sunspotz reflector did even a better job. Granted , the light bouncing back from the reflector was “super” bright. That’s why the bride is looking down. No problem, I still think the image works.
Camera specs: Canon 40D fitted with Canon 10-22mm lens at 22mm, F18 @ 1/200 second, ISO 200. Enjoy! -David
Ever have one of those days where you just can't see the light at the end of the tunnel. I hate to say it, but my entire weekend felt that way ;~) The BIG project for me is to push out the marketing for our upcoming PhotoPro Expo 2012 by the end of this week.
Let me share with you one of our convention highlights. It is like way cool. If you've attended Photoshop World over the last few years, you've experienced the model shoot-out. It is really fun. Four bays completely propped and jammed packed with Westcott lighting and great looking exotic models. Check out the video below to see what I mean - like I said, WAY COOL!.
Anyway, my good friends at Westcott have agreed to do the same thing for our PhotoPro Expo 2012 convention! I can't wait. And, hey gang, that's just for starters. I'll keep you posted as all the plans to come together. Remember, use promo code PPEDAZ12 to save $100 off registration.
On To Quick Hit Monday:
For today's Quick Hit Monday post I've gathered some very interesting and informative links for you. I hope you enjoy them.. Let's get right to it. Here we go...
On Photography:
I didn't find much on wedding photography this past week but did discover some great links with some terrific photography.
1. Photography Tips From Damian McGillicuddy: A very detailed de-construction of a great fashion shoot. [link]
2. Robert Seale Featured in Digital SLR Magazine: Some very cool sports photography. [link]
3. 40 Realistic Examples of Levitation Photography: Hey, just for fun - makes me wonder how they were done ;~) [link]
4. The Ten Most Expensive Photographs: After last week's post on the most expensive photograph ever sold, I thought you may be interested in the rest of the Top 10 list of expensive images. [link]
Gadgets – Gear On The Cheap:
Super Cheap DSLR Remotes: Photographers are three things and the first of those is CHEAP - me included. That's why I liked this link to cheap DSLR remotes. Uhmmm, remote cameras in front of church during weddings? [link]
Photoshop Lessons, Goodies & Freebies:
This is my favorite section to collect and pull together each week. I can't believe all the good information available on line. Check out these links - a treasure trove of Photoshop resources!
Cool Tutorials:
1 . 5 Incredible Methods to Enhance Your Designs with Light: A wonderful set of lighting tutorials to get great lighting on your Photoshop project. [link]
2. How to play Photoshop Actions on Multiple Images with Batch Editing: I needed to see this again. It's one of those things you don't do every day. So seeing the process once again was a good refresher.[link]
3. 30 Worth Learning Text Effect Tutorials in Photoshop: I'm not a big TEXT guy, but the processes described in these tutorials are fascinating to see. [link]
4. 25+ Water Effect Photoshop Tutorials and Brushes: I wish I had known about these techniques for some of my past projects. [link]
5. 30 Rare Outstanding Collections of Photoshop Tutorials: Some of these tutorials are really "off the wall" but following and understanding them will really broaden your knowledge of Photoshop. [link]
Some Great Freebies:
1. 30 Free Vector Graphics for Your Daily Needs: A great set of useful Photoshop freebies. [link]
2. Free Tile-able and Seamless Pattern Sets: More FREE stuff. [link]
3. 450+ Free Unique Photoshop Brushes: I'm such a BRUSH junkie. [link]
4. Free Graphic Design Software Reviews and An Amazing Showcase: OK, GIMP has been receiving a lot of play lately. But now it also has a working version of "Content Aware Fill". GIMP is FREE - Amazing!!! [link]
Wrapping With A Little Inspiration:
Stunning Photo Manipulations Inspired by Nature: I'm always amazed at what the digital artists can pull off in Photoshop. [link]
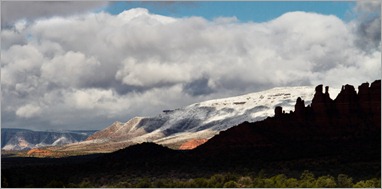
This is an image I made during our Sedona, AZ trip last week. It was just about a week ago when the weather service forecasted snow for the first time of the year in the Sedona area. We awoke to a very foggy morning with the clouds just beginning to clear. About 45 minutes later the sun began to peak through the clouds casting it's rays onto the distant hills.
What’s cool about this image is how one large cloud, which I’ve cropped out completely, shadowed the rocks in the mid-ground area of the image leaving them as a silhouette. If you look closely at the bottom of the image, you’ll see that the trees in the foreground just beginning to receive some of the morning sunlight.
I think that’s what I like best about this composition – I like seeing just the mostly snow covered mountains which otherwise would have been the bright red rock. Anyway, what can I say, our room had quite a view ;~)
Camera specs: Canon 7D fitted with 18-200mm IS lens at 100mm, F10 @ 1/500 second, ISO 200. Enjoy! -David
Hey gang, I’m keeping it short and sweet today. I’ve got a friend visiting in just a bit and I’m looking for a little time off before I have to go back to work. Just a few quick notes first though.
Approaching My 3,000 Post Here At DigitalProTalk!
I can't believe it, I just checked how many posts I made here at DigitalProTalk and was surprised to se I’m quickly approaching my 3000th post! Actually, the 3000th post should hit next Friday about this time. I'll have more information next week on that for you then.
Brand New Technique Tuesdays In The Works
I'm also working on a couple of brand-new Technique Tuesday's that are a bit more involved than usual. I’ll be spending time over the weekend getting them organized and and taped. Once again they’re on lighting so I think you’ll really enjoy them.
How Much For That Picture In The Window?
So today I post my Image of the Day and I think it's looking pretty good, right? But, then I come across this post about how the photograph below recently sold at auction for $4.3 million! I’m blown away!
The photograph named “Rhein II” was auctioned off for the mind boggling price of $4.3 million. This price makes it the most expensive photograph ever sold. Here is the link to the story right here.
I think I just may send off a few my Sedona images and just see how I fare at the next photo auction ;~) Like they say, I guess beauty is in the eye of the beholder.
Hey gang message for me today my friend should be showing up shortly went to grab a quick lunch. How about I see everybody same time same place bright early Monday morning for the 2991st post here digital pro-talk.
Have a great weekend everybody I'll see you on the flipside all the pixels willing. – David
I've been giving the girls top billing in my Image of the Day posts these last several days. Today I'm giving the guys a chance. Here's another image I made during my Napa Valley workshop just a few weeks ago. Again, it was made at the Beringer Winery where the grounds offered wonderful opportunities for so many different kinds of portraits. A few days ago I posted an image entitled the “Beautiful Lines” [link]. It was a portrait of Megan on one of the walkways at Beringer. As I pointed out in that post I love how all the lines led to our beautiful subject.
This image was made in exactly the same location but from the top of that walkway looking back in the opposite direction. Once again the background of the scene supports a portrait of our handsome young man, Sammy, quite well.
The main challenge of this portrait was to make him look his best in his portrait. He was carrying a few extra pounds around his middle and wearing a suit that was just tugging a bit at its buttons. I decided to position him leaning back slightly on the railing you see in the foreground. This, in effect, slimmed him down quite nicely and with this congenial expression, I think we pulled off a pretty nice portrait of him.
I brought the light in from camera right, my Quantum through my Zumbrella, at 1/4 power. It was simply a matter of balancing the flash illumination with the ambient light to obtain my final result.
Compositionally I decided to put him right in the middle of the image area flanked by the fall foliage on the left and the Pavilion on the right. Look closely and you'll see those railings in the background leading the viewer’s eye right to our main subject. Even though I was shooting at F5 .6 I was still able to throw the background significantly out of focus so that the viewer’s attention remains on our main subject.
DAZNOTE: I occasionally get questions about why I am using my 18 – 200 MM lens for so many of my images. The answer to that question is this; When I'm in a training session as I am in all my workshops and master classes, the 18 – 200 MM lens is a perfect optic for a training situation. It allows me a full range of focal lengths from wide-angle to telephoto which allows me to work, and teach, very quickly and efficiently.
Had I been making this portrait under normal conditions I, of course, would have been using my 70 – 200 MM lens at a wider aperture. So, even though you see this lens referenced a lot in my daily posts at DigitalProTalk, know that a lot of the time these images are made under teaching conditions where I will be using my favorite teaching lens the 18 – 200 MM lens.
Camera specs: Canon 7D fitted with 18-200mm IS lens at 90mm, F5.6 @ 1/250 second, ISO 800. Enjoy! -David