Friday, November 4, 2011

"Afternoon At Cathedral Rock"

Cathedral Rock

"Afternoon At Cathedral Rock"
©David A. Ziser

This image was taken a few years ago on a trip to Sedona, AZ. The scenery, colors, geography, and rocks are just beautiful to see.   Since we are spending time again in Sedona this week, I thought I would re-visit this image that I made on that earlier visit.

This image is one of the iconic locations from the Sedona area, Cathedral Rock.  This image was taken downstream of Cathedral Rock. It was taken in the late afternoon/early evening. The light was beautiful. The blue sky and white clouds reflecting in the calm waters added the azure peacefulness to the scene.

I also love this very wide angle view.  My low vantage point accentuated the stream foreground and contrasted beautifully with the red rocks in the background.  We have this image hanging in our home along with a many other images from Sedona.  It’s a great way to remember this beautiful part of America.

Camera specs; Canon 5D fitted with 12-24mm Sigma lens at 12mm, F9.0 @ 1/125 second, ISO 400. Enjoy! –David

____________________________________________

Hey gang, I’m cutting it short today.  We’ve got another super busy morning today and I promised LaDawn the rest of the day off after we wrap up our business here in the area.

It’s back to Northern KY on Sunday morning and I have to say, even with the great experiences we’ve had these past three weeks, it will be good to get home cold weather or not.

How about everybody have a wonderful weekend and I’ll plan to see you Monday morning.

Till then,  David

Thursday, November 3, 2011

"The Soft Curves Of Beauty "

0001- Soft CurvesIMG_0501-Edit-Edit-Edit-Edit

"The Soft Curves Of Beauty "
© David A. Ziser

This is one of my favorite images I captured in Tampa a few weeks ago.  It is a totally natural light image - no flash allowed.  Sometimes the light is just perfect so forget the flash and take advantage of that beautiful soft light.

Not only did I have wonderfully naturally occurring light, I also had a fabulous location to work.  I love the soft curved lines of the railing.  It was a perfect compositional element for leading the viewer’s eye to my beautiful bride.

Next, one of the important ingredients of this image is the very pleasing background behind the bride.  I had to use "Live View" on my Canon 7D because I was reaching out over the railing so that I could frame up the background where I wanted it.  Many times you will have most of the ingredients of a great image but something will be missing to bring it all together.  That was not the case here.

Look at how all the lines in this image, including the lines of the bride, are leaning AND leading your eye to the right side of the image.  Placing the bride at nodal point #3 was the perfect position for her in this composition.  Add a pleasing expression and we have a very nice bridal portrait.

Camera specs: Canon 7D fitted with 18-200mm IS lens at 200mm, F11 @ 1/100 second, ISO 800.  Enjoy!  -David

Business Day Thursday: Are You Behind the Eight Ball? 3 Ways to Boost Holiday Profits.

Good Morning Everybody,

This is a very busy day for us so I want to get today's post out the door pretty quickly.  Let's jump right into it.

After getting yesterday's post up, I was wondering what I would post for today's Business Day Thursday post. Yes, that happens a lot around here ;~) Anyway, my mind was on a lot of other things and I wasn't even thinking of what today's topic would be.

November 2A minute or two later, I glanced at my watch for the time and realized that it was already November 2, 2011. With all of our travels, time really is flying by and I had lost track of just how close we were getting to the holidays.  My gosh, with Thanksgiving only 3 weeks away and Christmas right around the corner after that, it struck me that I was behind the eight ball.  It was time to get some plans in gear for the holiday season.

Business Day Thursday: Are You Behind The Eight Ball?

Eight BallHow many of the rest of you are in that same boat?  As a studio owner we need to plan well in advance of the Christmas holidays.  And that planning needs to be done on two fronts.  First, what type of Christmas promotions are you planning on running.  And secondly, is your production schedule in place to get all the orders out in time for the holidays?

I thought I would break this post into two parts.  Let's first discuss several kinds of promotions you need to be doing this time of year.  Why is this important? Because this is the time of year most folks will spend a substantial amount of their discretionary income.  That's a fact, economic downturn or not - it's the holiday season and people will spend more money now that any other part of the year.

Successful businesses are always part of the holiday action. And, if you see yourself as a successful studio operation, or at least heading in that direction, you need to be part of the action too.

So what kinds of holiday promotions can you run?  Here is a quick sampling that you might find helpful.

Thanksgiving Portrait1. The Fall portrait promotion window is long since past but you have another opportunity waiting in the wings - the Thanksgiving Day portrait promotion.  What happens at Thanksgiving - families come together, many families from around the country come together to celebrate the holiday.  

This is a perfect opportunity to offer your Thanksgiving Day Portrait special.  Sessions will be photographed on Friday after Thanksgiving and throughout the weekend if the client desires.  You need to let your clients know now that need to get scheduled now for that very limited photographic window of opportunity.

Christmas idea2. How about a Merry Christmas Grandma and Grandpa promo?  Ok, what am I talking about?.  Young families always want to share the latest photographs of their small children with the grandparents.  But, how often do photographers target that market?  Most of us are wanting to promote the family portrait.  I'm suggesting that you divide and conquer and photograph at least part of the family.  And your best candidates are the kids.

My best suggestion is to reach out to some of your best clients with small kids, photograph them, and make them the poster kids for your Grandma/Grandpa promotion. There are all kinds of ways to bundle the images from the photography session.  You may include the portrait session, 2 - 8x10's and some wallets all showcased with a really nice holiday Matt treatment like you see above.

Don't miss the opportunity to offer mom and dad some beautiful wall decor of the kids too - I'm thinking multiple images hanging as a nice wall collage.  These smaller images with multiple photographs thus a wall wall collage are also a nice way to answer the objection to large wall portraits.  Wall collages require smaller images but when you combine five, six, seven images, the combo makes for a very compelling presentation for the most important people in mom and dad's life.

Holiday Cards3.  This is also the perfect time of year to be contacting your past clients - all clients, portrait and wedding alike - about holiday cards.  You may already have some great images from a previous portrait session or a wedding that would be perfect for holiday cards.  Holiday cards are not a great profit center taken individually but when added up and taken as a whole can become a nice boast to the studio profits his time of the year.

Folks, these are just a quick suggestions and I've got a lot more.  But I bet you do too.  It's time you put on your studio promotion thinking cap and come up with several of your own.  The important thing to note is that NOW is the time to get started on these ideas.  You are kissing a wonderful opportunity good-bye if you procrastinate.

How successful do you want to be?  NOW is the time to be planning and doing your holiday promotions.  Are you still behind the eight ball or are you ready to kick things into high gear!

_____________________________________________________

Hey gang, that's it for me today.  We are out of the door early today so enjoy the post and I'll plan to see you tomorrow with an easy post to take you into the weekend.

Have a great one everybody!  -David

Wednesday, November 2, 2011

"Texas Beauty"

Texas Beauty

"Texas Beauty"
© David A. Ziser

This image is not exactly what it appears to be.  I set up the photograph with my strobe firing at full power from camera right.  The goal was to really pull in the color from the sky with the selected exposure.

The problem in exposing for the sky was that I completely lost the detail in the building in the background. OK, what to do? It’s time for a trip to Lightroom and Photoshop to finish the job.

That, folks, is a luxury, we have in today’s digital age.  Software tools are just as important to the finished image as the hardware we use to create the original image.

The rich color of the her orange top against the rich blue sky really draws your attention to this pretty young lady.  Look too at how the lines of the building’s roof in the background also lead your eye to our model. I also like how all the clouds add texture to the sky.  All these elements all come together to present what I think is a pretty cool photograph.

Camera specs: Canon 7D fitted with Sigma 8-16mm lens at 12mm, F6.3 @ 1/250 second, ISO 200.  Enjoy!  -David

The One The Got Away: How Small Things Can Make A Big Difference

Good Morning Everybody,

We arrived safe and sound yesterday afternoon and were settled in by early evening.  The drive into Sedona, AZ is a wonderful preview to just how beautiful this part of the world is.

Sedona Appraoch

We’re here for a few days on non-photography related business and then a few days of R&R before heading home on Sunday morning.

LaDawn and I are trying to claim today as a day off so let’s get right to today’s post.

Sync Cheating Lighting Part 2, Continued…

Hey everybody, thanks for all the comments on yesterday’s post Light Bending, Pixel Pushing, Sync Cheating Lighting! [link].  Many of you mentioned why I don’t use High Speed Sync features built into the Nikon and Canon flash system. 

HighSpeedFlashSync_thumb5Here’s the deal – High Speed Sync works just fine BUT only up to certain distances.  It’s great for short range flash shots up to about 6-7 feet away according to my informal testing. 

That means it really falls short for the much longer distances I prefer to use my flash.  That’s another reason I prefer the Quantum flash.  It’s about 3 times more powerful than my Canon 580 EXII shoe mount flash.

And finally, if you followed yesterday's tutorial, I used my sync cheating technique to literally change how I illuminated the image.  I manipulated how the light lit my subject to very good effect as I tried to demonstrate in the article's accompanying images.

The One The Got Away: How Small Things Can Make A Big Difference

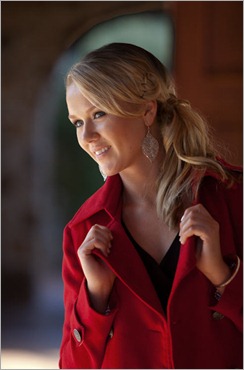
Today I’m taking liberty with one of our recent class members very beautiful images to help make my point.  Let’s take a look at the image to the right.  It’s a beautiful portrait, isn’t it?
TOTGA2 -1

I love several things about this image:

1.  I love how the maker positioned the subject within the partial arch you see in the background.

2. I love the easy pose and soft expression on the model.

3. I love the soft loop lighting falling on our model.  It’s doing a great job giving dimension to this portrait

The bottom line is that this is a very nice portrait.

OK, now time for just a little, I promise, just a little nit-picking. This image, although very beautiful, could have flattered our subject just a bit more.  When posing my subjects, I always find myself working with the classical views of the face.  That is - I try to photography my subjects the same way the great portrait painters of years past painted their subjects.

Bear with me here – I told you this was going to be a nit-picking discussion. I wish the subject was turned JUST SLIGHTLY back towards camera.  Two things that bother me slightly about this image are:

1. Notice that the far eye isn’t framed by the far part of the face and seems to hang out into space.  With the subject’s head turned a bit back to camera, the eye would have been framed up and we would have a more flattering portrait of our lovely young lady.

2. More importantly, look at how close the tip of the subject’s nose is to her cheek.  The nose is so close that what we see is what I like to call the “Pinocchio effect”. The net effect for the viewer and to the detriment of our model is that the nose appears larger that it really is.
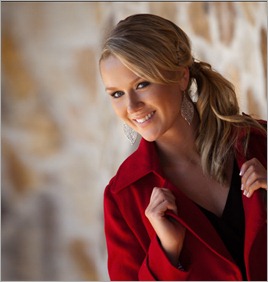
TOTGA2 -2Now let’s look at another photograph of this same young lady.  See how she has been turned ever so slightly back towards camera.  Notice too what a difference it makes to her portrait.

Here facial features are better represented which makes her look great.  Notice that in the above image those facial features looked a bit cramped.  Notice too that with the far eye contained by the far side of the face and with the nose placed further away for that far cheek, we have a very flattering view of our model.  It was only a tiny change, but it did make a big difference in our finished portrait.

Everyone wants to look good in front of the camera and as portrait photographers, it is our job to do just that. I really try to keep things very simple in my approach to photographing people.  I mostly follow the rules of what the great artists of years past followed when they painted the kings and kings and dukes and duchesses of the day.

I want my clients to look like royalty too in front of my lens. Why? Because they are! And, that perspective alone can change how you create your next portrait.

_____________________________________________________

Hey gang, that’s it for me today.  I promised LaDawn a day off before our two very busy days coming up tomorrow and Friday.  I’m making no promises when I’ll get the posts up either, but hang in there, I’m sure something will pop.

Have a great rest of the day – hope to see you tomorrow.

-David

Tuesday, November 1, 2011

"Dark Beauty"

0001- Dark BeautyIMG_0575-Edit"Dark Beauty"
© David A. Ziser

This is an image I made during my recent visit to Tampa two weeks ago at my Dave Cross workshop.  Once again we were working near this very large oak tree with it’s sprawling branches.  The large sprawling branches made this location a perfect candidate for my super wide angle Sigma lens.  I felt I could really accentuate the setting even more with that lens.

This image shows the desired effect.  Look how the large oak seems to reach out to the bride almost wanting to embrace her in it’s branches.  I did go in with Photoshop and fill all the light holes with more leaves to add to the dark, slightly ominous feeling to this image.  It’s almost an eerie feeling but since this is the day after Halloween I think it plays just fine ;~)

The cool thing about this image is the lightning – yes, that is 1/400 second in the camera specs below.  OK, how was I able to use 1/400 second when the native sync speed of the camera is only 1/250 second. 

That is the topic of discussion in today’s Technique Tuesday episode below. Why not give it a read and listen, I’ll think you’re really enjoy what I’ve got to share with you today.

Camera specs: Canon 7D fitted with 8-16mm Sigma wide angle lens at 8mm, F5.6 @ 1/400 second, ISO 800. Enjoy!  -David

Technique Tuesday: Light Bending, Pixel Pushing, Sync Cheating Lighting! A Life Of Living Dangerously!

Good Morning Everybody,

We arrived safe and sound after a short and uneventful 4 hour drive from Palm Springs to Phoenix yesterday.  During the drive we continued to listen to the Steve Jobs bio.  He’s about 30 now, worth about 250 million from Apple going public and just threw himself a birthday party for 1,000 of his closest friends. Oh, and he’s about to be ousted by John Scully and the Apple board.  Like I said yesterday, a very fascinating story.  Anyway, the listen sure makes the driving time go by quickly.

Sedona RidgeWe have a quick business meeting this morning and then its on to Sedona, AZ.  We hope to be settled in by around 3:00 p.m., catch dinner with a friend tonight, and have a complete day off tomorrow.  We love that part of the country and I hope to spend some time hiking and capturing some great photographs while we’re there.

Anyway, that’s the latest update on our travels, how about we get on with this week’s episode of Technique Tuesday.

Light Bending, Pixel Pushing, Sync Cheating Lighting!

I’m a BIG fan of “cheating the sync” on my DSLR.  Maybe it goes back to the film days when I was shooting Hasselblads.  The medium format Hasselblad had the ability to sync up to 1/500 second and that gave us Hassy shooters the ability to really work the light outdoors especially when using flash.  That 1/500 second let us create some gorgeous sunset images because of the that fast sync speed.

Check out the three images below made years ago on my Hasselblad as I increased the sync speed from 1/30 second all the way up to 1/500 second and in about 45 seconds.  What a difference the faster shutter speed makes in adding a dramatic feel to the image.

1-30 sec

1-125 second

1-500 secWhen I first transitioned to digital in 2000, one of my first cameras, a Nikon D1x synced all the way up to 1/500 second – no big deal – it made the transition from film to digital rather easy.  This next image was made at 1/500 second on my old Nikon D1x – pretty cool, don’t you think?

Early wedding pic

The only thing I had difficulty adjusting to was the rectangular format. Hassys shot square format. Nevertheless, I did enjoy that faster sync speed.

As the cameras “improved” the sync speed was reduced to about 1/250 second for most of the camera manufacturers.  Now it became a “pain in the neck” to achieve the same results I was getting at my faster sync speeds.  What was a photographer to do?  It was time to live dangerously, throw caution to the wind, totally disregard what the camera manuals said about the “native 1/250 second sync speed” and kick things up a notch!

JailShutter Sync PoliceSo what happens when you begin syncing your flash images to 1/320, 1/400, or even 1/500 second?  Are the “shutter sync police” going to arrive on the scene and throw me into the, dark “shutter sync” jail somewhere?

Do Not RemoveI thought not.  I had been down that dangerous path before, many times, as a matter of fact.  Yes, I used to routinely rip the “Do Not Remove Under Penalty Of Law” labels off of pillows and mattresses.  Since I had danced down that perilous path before, I was ready to challenge the “Shutter Sync Police” this time – bring it on!

StartrekSo what really does happen when you break the rules, push the envelope, tread where most photographers have never treaded before?  What happens is that all sorts of new lighting/photographic possibilities open up for you.

Cheating the sync gives you a brand new way to control your light on the scene.  It gives you wonderful control on how you light your subject.  Now it’s easy to create a much more dramatic look to your images with your new found understanding of how to cheat the sync on your camera.

All kidding aside, it’s a great way to stretch the boundaries of photographic possibilities and easily create images that would have required a lot more equipment and a lot more time to produce.

Why not hit the PLAY button below and enjoy the show.  I think you’ll really enjoy this week’s lighting tutorial and get a real “kick” out of the results when you see them. 

It’s not “brain surgery” or “rocket science”.  It’s just a cool way to get a really nice visual result.  Come on, walk on the wild side with me and check it out ;~)______________________________________________________

Hey gang, that’s it for me today.  We are heading out shortly for my meeting and then it’s on to Sedona, AZ.  I’ll plan to see you tomorrow for another episode of the “How Small Things Can Make  A Big Difference”. 

Have a great day, I hope to see you then,  David